
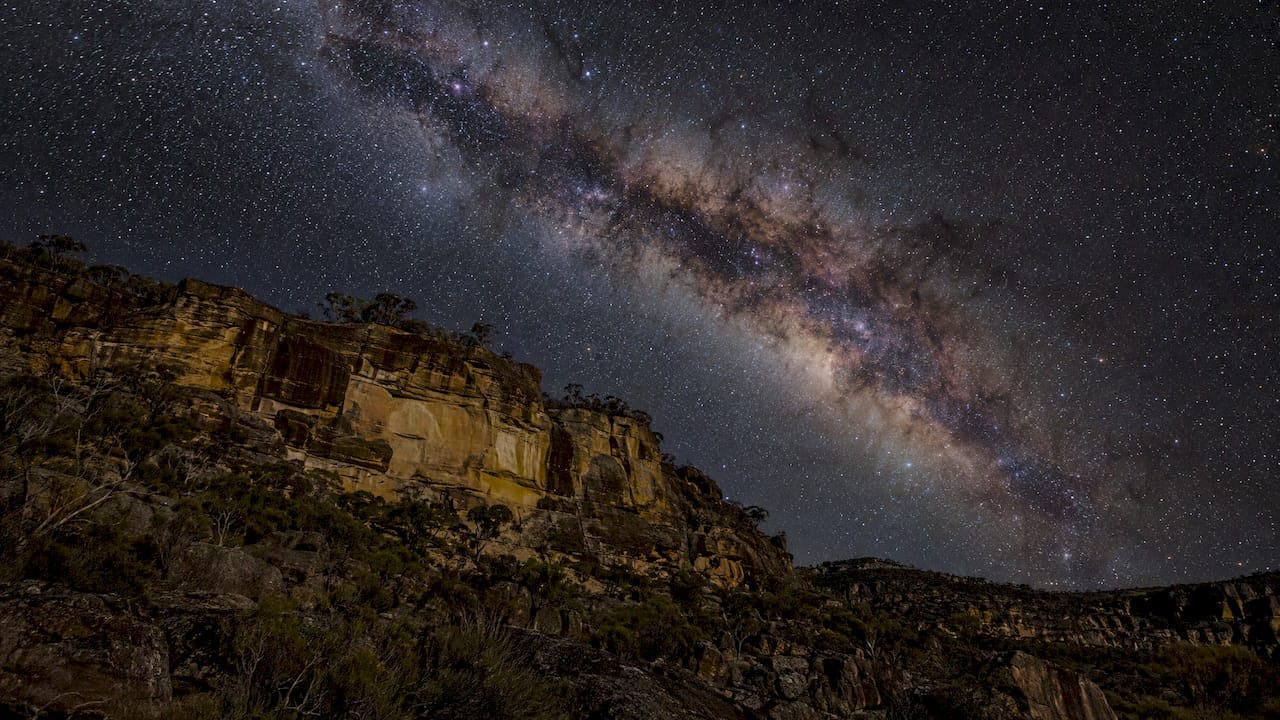
A great Milky Way landscape is two photographs in one: a sky full of galactic detail and a foreground worth looking at. In Australia, the best results come from shooting in the cooler months, on a moonless night, far from town lights, with a wide, fast lens on a tripod and a real place in the frame. This guide covers when and where to go, the gear, the settings, composition, natural-looking edits and the access rules at well-known locations.
TL;DR
- Winter is the prime season: cold, dry air holds less water vapour, so skies look clearer, and the galactic core is high in the southern sky by July.
- Choose a new moon night, a site well away from city glow and a forecast with very little cloud.
- Bring a camera with full manual control, a wide lens of about 14 to 24mm at f/1.8 to f/2.8, a sturdy tripod and a red-light head torch. Shoot RAW.
- Give the sky a subject: a hut, a lake reflection, a tree or a rock formation turns a star picture into a landscape.
- Check park rules before you go. Some of Australia's most photographed places restrict where you can stand, drive or camp.
Table of Contents
- When can you see the Milky Way in Australia?
- Where to photograph Milky Way landscapes in Australia
- Plan around moon, weather and light pollution
- The gear you need
- Camera settings that work
- Composition: make it a landscape, not a star chart
- Editing Milky Way photos so they look natural
- Access, permits and safety
- Our perspective on Milky Way landscapes
- Learn it with us, or bring the landscape home
- FAQ
- Sources
When can you see the Milky Way in Australia?
The Milky Way is overhead every clear, dark night, but the bright, textured core that photographers chase is seasonal. The ABC's science team notes that winter is the best time to photograph it, because cold, crisp night air holds less water vapour than warm, humid summer air, which makes the sky look particularly clear.
In practical terms, think of a long season rather than a single week. The core rises in the early hours of the morning in the cooler, drier months, climbs higher in the sky as winter goes on, and gradually shifts toward the evening sky and then toward the west as the year turns. By late spring it is setting earlier and earlier, so the window for a classic core shot shrinks. Plan next year's trip around the months from autumn to early spring, and use a planetarium-style app to check where the core sits at your chosen hour.
Two dials matter more than any other:
- The moon. You want a new moon, or the days either side of it.
- The hour. The core is rarely well placed at 8 pm. Expect to be out well after sunset, and often into the small hours.
For the best views, look toward the south east and south west well after sunset around the new moon, away from bright city lights.
Where to photograph Milky Way landscapes in Australia
Australia is one of the best countries on earth for this kind of work: huge distances between towns, low humidity across the interior and a southern hemisphere view of the galactic centre. Australian Traveller's round-up of top locations includes the East MacDonnell Ranges outside Alice Springs, Lincoln National Park in South Australia, Warrumbungle National Park in New South Wales, Kati Thanda-Lake Eyre National Park and Uluru.
Some of those deserve a closer look:
- Warrumbungle National Park, NSW. Australia's first Dark Sky Park. Its remote position, high altitude and low humidity make the Milky Way hard to miss, even with the naked eye.
- Kati Thanda-Lake Eyre, SA. A vast, flat horizon, and a salt surface that can give you a clean line between earth and sky.
- Uluru and the Red Centre, NT. Strong silhouettes and very dark skies, with access rules covered below.
- Lake Tyrrell, Victoria. A salt lake that can mirror the stars when it holds water. The best time to visit is usually winter, between June and August, when the lake is most likely to be filled.
- Coastal and ranges sites. A rocky headland, a sea stack or a ridgeline within a couple of hours of a capital city can work well if you can find a dark bearing away from the glow.
If you are building a wider trip around these places, our guide to Australian outback landscapes explains what the interior really looks like on the ground, and our guide to natural landscapes to explore helps you choose regions by season.
Plan around moon, weather and light pollution
Most failed night shoots fail before the camera comes out of the bag. PetaPixel's planning advice lists moon phase, expected light pollution, Milky Way alignment and weather as the four things to check, and warns that a full moon keeps most stars from being visible.

The moon
PhotographyLife recommends shooting during new moon, and says a quarter moon or more will wash out the Milky Way. A bright moon that has set, or has not yet risen, is just as good as no moon, so check moonrise and moonset times, not only the phase.
Light pollution
City glow is the quiet killer of Milky Way pictures. The same guide recommends getting far away from city lights for dark skies. Use a light pollution map to pick a site, then check which direction your lens will face. A town 60 km away can still brighten one horizon, so a dark direction matters as much as a dark site.

Cloud and weather
For crisp Milky Way frames, PhotographyLife suggests looking for 0 to 10 percent cloud cover. Higher cloud can suit time-lapse sequences, but a clear sky is the safest target for a single frame. Wind matters too: a gust at 20 seconds will blur a tripod shot, so hang your bag from the centre column for stability.
A simple planning checklist
- Pick a new moon window in the cooler months.
- Choose a site with a dark sky in the direction you want to shoot.
- Check the forecast for cloud, wind and, in desert country, temperature swings.
- Use a planning app to find where the core sits at your chosen hour, and where the foreground subject sits relative to it.
- Visit the location in daylight if you can. Finding a safe tripod position in the dark is harder than it looks.
- Tell someone where you are going. Many of the best sites have no mobile reception.
The gear you need
You do not need a studio of equipment, but a few things are non-negotiable. A camera guide from an Australian photographic retailer sets out the basics:
- A DSLR or mirrorless camera with manual control over shutter speed, aperture, ISO and focus.
- A wide-angle lens around 14 to 24mm, preferably f/1.8 to f/2.8.
- A sturdy tripod.
- A remote shutter release or a short self-timer, so you do not shake the camera when you press the button.
- A red-light head torch, which protects your night vision and does not spoil other photographers' shots.
- RAW capture, so you have the data to work with later.
Add spare batteries, because cold drains them quickly, a lens cloth for dew, warm layers and a thermos. A sturdy, well-balanced tripod is the item most beginners underspend on.
Camera settings that work
Every camera and sky is different, so treat these as a starting point and adjust after the first test frame:
| Setting | Starting point | Why |
|---|---|---|
| Mode | Manual (M) | Auto modes cannot expose a dark sky properly |
| File format | RAW | Maximum flexibility for white balance and noise |
| Aperture | Widest your lens offers, often f/1.8 to f/2.8 | Gathers the most light |
| Shutter speed | About 10 to 25 seconds | Long enough for light, short enough to avoid star trailing |
| ISO | About 1600 to 6400 | Balance brightness against noise |
| Focus | Manual, using Live View zoomed on a bright star | Autofocus hunts in the dark |
| White balance | Fixed, around 3800 to 4200K | Auto shifts between frames |
| Stabilisation | Off on a tripod | It can introduce blur on a locked-off camera |
A few habits make a big difference:
- Focus once, then check. Zoom your screen right in on a bright star, adjust until it is a tiny point, then take a test shot and review it at full magnification. Do not touch the focus ring again.
- Respect the shutter limit. Because the Earth rotates, long exposures turn stars into short streaks. Wider lenses and shorter shutter times keep them as points. If you see oval stars at the corners, shorten the exposure and lift ISO.
- Level the horizon. A crooked horizon is hard to rescue in a night image, because there are few straight lines to guide you.
- Shoot a daylight or twilight foreground. Some photographers take a lower-ISO, longer exposure of the ground separately, then blend it in later.
Composition: make it a landscape, not a star chart
The images that stay with people have something on the ground. Melbourne astrophotographer Markus Stone says the best astrophotos usually feature the landscape too: an old hut on a hiking trail, a lake at a campground reflecting the stars, or even a friend's house in the sticks, if it is fairly dark. He also notes that timing a shot when the galactic core is not too high above the horizon can create dramatic silhouettes against the Milky Way.
Some composition ideas that work across Australian terrain:
- Silhouettes. Ghost gums, grass trees, sea stacks and sandstone towers cut sharp shapes against the glow.
- Reflections. A still lake, a salt pan with a thin film of water or a rock pool doubles the sky.
- Leading lines. A dirt track, a fence line or a river bend pulling toward the core gives the eye a path.
- Scale. A small figure with a head torch turned low, or a tent glowing softly, shows the immensity of the sky.
- Vertical or horizontal arch. A vertical frame suits the rising core, while a wide panorama suits the long, arching band.
Golden hour is a good rehearsal for all of this. Scouting the same location in daylight lets you pick your foreground with confidence. Our guide to photographing golden hour landscapes covers how to read the light in the same places you will later shoot at night.
Editing Milky Way photos so they look natural
Night skies reward a light touch. PhotographyLife's Lightroom walkthrough for Milky Way images suggests working from broad to fine: start with global adjustments such as the basic panel, sharpening, noise reduction and cropping, then move to local work with gradients and brushes, and spot-heal away satellite or aircraft trails at the end.
The approach that keeps images believable:
- Set a neutral white balance first. Get the colour of the sky right before you chase drama, then bring vibrance and saturation back to zero if you pushed them to find it.
- Lift shadows and contrast gently. The core should look luminous, not carved.
- Reduce noise sensibly. Too much smoothing makes stars look like smudges.
- Use local adjustments with restraint. You can brighten the core slightly or darken the surrounding sky to help it stand out, but avoid halos around the foreground.
- Keep the foreground honest. Exposure and colour on the ground should match the light you actually saw.
- Compare before and after. Step away from the screen, then look again. If the sky now looks like a poster rather than a place, pull it back.
Editing is a craft in its own right, and it is where many keen photographers want a second pair of eyes. That is exactly what we cover in our courses.
Access, permits and safety
Some of the best Milky Way locations are also protected land, so check the rules before you plan your night.
- Uluru. Personal photography does not require a media permit, but visitors must stick to designated paths and respect no-go areas. Commercial and public social media account holders, including influencers, content creators and bloggers, need to apply for a permit, and the north-east face of Uluru is a banned area for photography.
- Lake Tyrrell. Visitors are prohibited from driving on the lake surface, and camping or overnight parking is not allowed.
- National parks generally. Rules on night access, camping, drones and tripod positions vary by park. Check the park's official page for the current conditions before you travel.
Safety in the dark matters as much as the shot. Take plenty of water on remote roads, carry a spare tyre and a paper map, watch for wildlife on tracks at night, and be careful near cliff edges and water when you are looking at a screen rather than your feet. Where a place is remote, a satellite messenger or personal locator beacon is a sensible addition.
Our perspective on Milky Way landscapes
Over many years of photographing Australia and the world's great wild places, we have learned that the night sky is simply another kind of light. It asks for the same things as a dawn on a coastline: patience, planning and a foreground that earns its place in the frame.
That is why our award-winning prints are made with panoramic medium format film and digital cameras. A wide, immersive format gives a sweeping landscape the room it needs, and the detail in the finished print is what people notice when they live with it on a wall.
We also believe the best way to improve is to stand in the landscape with a small group and an experienced instructor beside you. Our workshops are small-group, run with luxury arrangements and led by our team of professional photography instructors, so you spend your energy on the photograph rather than the logistics.
If you love the idea of the Milky Way over an Australian horizon, start with the daylight scouting, learn the craft of exposure and composition, and let the night sky become the next chapter.
Mark
Learn it with us, or bring the landscape home
If you would like to build your skills with guidance, our 1 day photography courses are a friendly introduction to exposure, composition and light, and our private lessons let you focus on exactly what you want to improve. For the bigger adventure, our photography tours take small groups to outstanding landscapes across Australia and around the world.
Prefer to enjoy the landscape rather than shoot it? Explore our limited edition landscape prints or our open edition prints, collected in 35 countries. For something smaller, our acrylic blocks are $295 each, with Australia-wide postage and handling of $24.95, and a gift certificate starts from $50. Businesses looking for landscape imagery can also explore image licensing.
FAQ
What is the best month to photograph the Milky Way in Australia?
Winter is generally the best time, because cold, dry air makes skies look especially clear. The galactic core is high in the southern sky by midwinter, so June to August is a strong window, especially around a new moon. Autumn and early spring can also work if you are willing to shoot late at night.
Do I need an expensive camera for Milky Way landscapes?
No, but you do need manual control and a fast, wide lens. A DSLR or mirrorless camera with a 14 to 24mm lens at f/1.8 to f/2.8 is the standard recommendation. A sturdy tripod and a remote release or self-timer often matter more than the camera body.
How dark does the sky need to be?
As dark as you can reach. Choose a new moon night and a site well away from city lights, and aim for a forecast with very little cloud. Even a distant town can glow on the horizon, so face your lens away from it.
Can I photograph the Milky Way at Uluru?
Yes, personal photography does not need a media permit, but you must stay on designated paths and respect no-go areas. The north-east face is off limits for photography, and commercial users and content creators need to apply for a permit. Check the current rules on the official park pages before you go.
Sources
- 9 best places to see the Milky Way around Australia, Australian Traveller
- How to take a stunning photo of the Milky Way, ABC News
- Mysteries and marvels of our Milky Way, Stargazers Club WA
- How to Photograph the Milky Way, PetaPixel
- Photographing the Milky Way: A Detailed Guide, PhotographyLife
- How to Edit Milky Way Photos in Lightroom, PhotographyLife
- Getting started in DSLR photography of the Milky Way, Optics Central
- Lake Tyrrell, Photo Review
- Uluru photography rules and media permits, Nine