
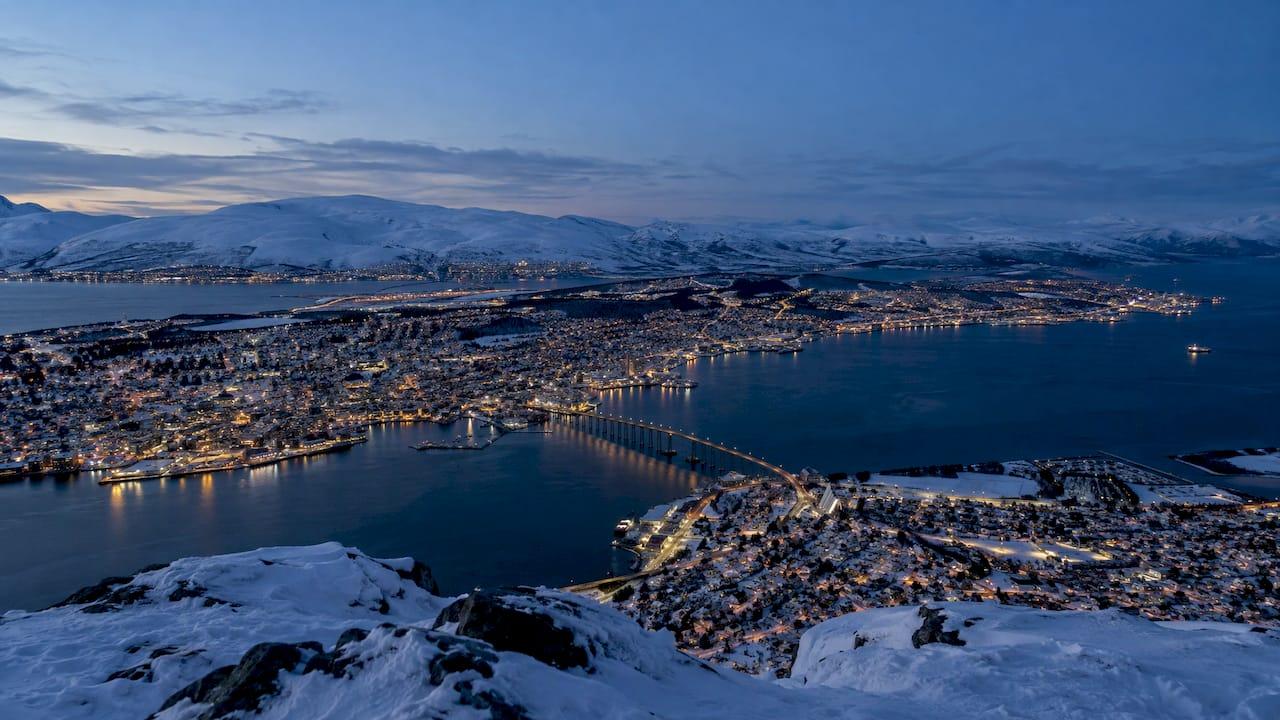
Tromsø rewards photographers who plan for three things: where the horizon is dark, which way a spot faces, and how the weather looks on the night. Start at the city's southern tip for an easy first frame, then move to the fjords of Kvaløya island for mountain-walled reflections, and shoot aurora from late August to early April with a tripod, a wide fast lens and settings you have practiced at home.
We write this as landscape photographers who build trips around light, foreground and patience. Below you will find the spots worth your time, the season that suits your style, the safety basics for a winter shoot and a starting set of camera settings.
TL;DR
- Easy and close: Telegrafbukta, Prestvannet and the Fjellheisen cable car viewpoint all sit on or near the city island.
- Most photogenic: Ersfjordbotn, Grøtfjord and Sommarøy on Kvaløya, where water, peaks and beaches give you foregrounds.
- Season: aurora is possible from late August to early April, with the best hours usually in the late evening.
- Settings: manual mode, manual focus on a distant light or star, ISO 1600 to 3200, the widest aperture, 5 to 15 seconds.
- Plan the logistics first: dark sites on Kvaløya need a car with winter tires, warm gear and a shared return time.
Table of Contents
- How to think about a Tromsø photo spot
- Close to the city: easy first frames
- West of Tromsø: the fjords of Kvaløya
- A simple comparison
- When to go
- Plan access, weather and safety
- Camera settings for the aurora
- A four-night plan for photographers
- Bringing the Arctic home
- Our perspective
- FAQ
- Sources
How to think about a Tromsø photo spot
Tromsø sits at 69° north, far above the Arctic Circle, and sits within the aurora zone. That is why the same city offers three very different shoots: a harbor and city skyline, dramatic fjords within an hour's drive, and open dark skies for the aurora.
A good spot needs four things:
- A dark horizon. City light washes out faint aurora. Astronomers rate sky darkness on the Bortle scale, where 1 is the darkest and 9 is an inner-city sky. Spots further from town score lower, which means darker.
- A foreground. Water, boats, a beach, red boathouses or a frozen lake turn a green sky into a composition. Visit Norway's guidance is to compose with mountains behind and a beach or campfire in front, leaving space for the aurora at the top of the frame with a wide-angle lens (Visit Norway).
- The right orientation. The aurora oval sits north of Tromsø, so a north-facing view catches weaker displays. Enclosed fjords need a stronger night but reward you with mountain walls around the lights.
- Safe access. A spot you cannot reach or leave safely in winter is not a good spot.
Close to the city: easy first frames
If you land after dark and want to shoot the same evening, these are your options.
Telegrafbukta
This small park at the southern tip of Tromsøya faces away from the city center, which gives a darker horizon to the east, south and west and open water as a foreground. Reports describe a walk of about 35 minutes or a ride on local buses 33 or 34 (Fjordscout). It is exposed, so allow for wind and slippery rocks. Rocks and boats make useful foreground anchors on a calm night.

Prestvannet
This lake on the island is a practical option for a quick session. In winter its frozen surface becomes a broad flat area that works for reflections and wide frames. Expect more ambient light than at Telegrafbukta, so it suits a short test of your settings more than a signature aurora shot.
Fjellheisen and Storsteinen
The cable car lifts you to Storsteinen at 421 meters, where you get the fullest panorama of the city, the bridge, the strait and the surrounding fjords. It is the classic blue-hour city view and a good way to learn the geography before you drive anywhere. Check the operating hours and conditions before you plan a night session from the top.
Waterfront and Arctic Cathedral
The central harbor around Prostneset gives you boats and reflections in softer light, and the Arctic Cathedral's strong architectural lines suit blue hour. These are daytime and twilight subjects, ideal when the polar night leaves a few hours of soft light around midday.
West of Tromsø: the fjords of Kvaløya
The biggest images tend to come from Kvaløya, the large island west of the city. The drives are long enough that they deserve their own plan.
Ersfjordbotn
About 20 km west of the city, this fjord arm is one of the most photogenic stretches near Tromsø. Calm water mirrors snow-covered peaks, red wooden houses line the shore, and it is widely photographed under the aurora (Your Photostart). It also works at golden hour and blue hour, when you can frame the boathouses against the U-shaped valley. One note on names: Ersfjordstranda on Senja island is a different destination from Ersfjordbotn on Kvaløya (GoTromsø), so check the map before you set your navigation.

Because the fjord is enclosed, it is best on stronger nights, when the lights rise above the mountain walls.
Grøtfjord
This is the pick when the forecast is modest. Its open mouth faces north, so weaker displays still reach the frame. Steep, jagged peaks sit behind a sandy beach, and calm sea gives reflections. Reports put it at roughly a 40-minute drive on the coast road west of town and among the darkest accessible spots (Fjordscout).
Sommarøy
A small island community with white sand beaches, fishing huts and a remote feel, about 70 km from the city. White sand reflects aurora light, and the huts give you ready foreground subjects. In summer the same beaches suit long exposures under the midnight sun (Tromso App). Treat it as a day trip with a flexible return, because the drive back after a late shoot is part of the plan.
Kattfjordeidet and Kattfjordvatnet
The pass and lake area offers shoreline trees and, when the lake freezes, ice reflections. It sits on the route between Ersfjordbotn and Sommarøy, so it is an easy extra stop.
A simple comparison
| Spot | Best for | Orientation | Access |
|---|---|---|---|
| Telegrafbukta | Quick aurora session, sea foreground | Open to south, west and east | Bus or walk from the city |
| Prestvannet | Frozen lake frames, settings test | Close to town | Short trip on the island |
| Fjellheisen, Storsteinen | City and fjord panorama | Elevated, all round | Cable car |
| Ersfjordbotn | Mirror reflections, red boathouses | Enclosed fjord | Drive west on Kvaløya |
| Grøtfjord | Aurora on modest forecasts | Faces north | Longer drive on Kvaløya |
| Sommarøy | White sand, huts, midnight sun | Open coast | Longest drive |
When to go
The official tourism board says the aurora may be visible in the Tromsø region from late August to early April whenever the sky is dark and clear, often most active between about 20:00 and 02:00, and that most organized aurora activities do not start until early September (Visit Tromsø).
Within that window, your choice depends on what you want to shoot:
- September and October: milder weather, fewer extremes of cold and the first dark nights. Good for first-timers who want easier driving.
- November to January (polar night): the sun does not rise above the horizon for much of the period, which gives soft twilight colors at midday and long aurora hours. Cold, stable weather is common in January.
- February and March: an often-cited sweet spot because you get returning daylight for landscapes and still-dark evenings for the lights.
- Late May to late July: the midnight sun suits golden light over the fjords rather than aurora.
One point from local sources is worth remembering: the best night matters more than the best month. Cloud cover is the deciding factor, and fjord and mountain weather can differ sharply between sites a short drive apart (Penguin Trampoline). That is why a flexible schedule of several nights beats a single booked evening.
For the same reason, think about how seasons reshape the same view. Our piece on how seasons change landscape photography explains why returning in a different month gives you an entirely different image.
Plan access, weather and safety
The dark sites are the remote ones, so a little discipline matters.
- Tell someone your plan. Share your location and expected return time, and avoid remote solo trips at night.
- Dress for far colder than the forecast. Winter nights call for serious insulation, spare layers and emergency supplies. Keep a charged phone, and keep spare camera batteries warm inside your jacket, because cold drains them quickly.
- Drive with winter tires or arrange transport. Ersfjordbotn and Grøtfjord are reached by car, and rental vehicles there should carry winter tires. Taxis can cover Telegrafbukta for non-drivers.
- Check conditions before every drive. Look at the cloud forecast for the specific fjord, not just for Tromsø. Mountain viewpoints, such as those in the Lyngen Alps, can carry avalanche risk in winter, so stay on the city side unless you have local knowledge.
- Watch the ground. Frozen shorelines and wet rocks are slippery, and a headlamp with a red mode protects your night vision.
These points come from a Norwegian regional guide (Tromsø Norway Tours) and apply the common-sense rules of winter travel in the Arctic.
Camera settings for the aurora
Visit Tromsø recommends manual mode, manual focus on a distant light or star, ISO 1600 to 3200, the widest aperture your lens has (for example f/1.8 to f/4), exposures of 5 to 15 seconds, a tripod with a self-timer or remote release, and practicing before you go (Visit Tromsø). Visit Norway adds that you should switch the flash off and focus on a bright star (Visit Norway).
A practical starting routine:
- Mount the camera on a sturdy tripod and set a wide-angle lens.
- Switch to manual focus, zoom into a bright star or distant light on the live view, and focus until it is a sharp point. Tape the ring if it moves easily.
- Start at ISO 3200, widest aperture, 8 seconds.
- Shoot in RAW and set white balance later, or start around daylight or auto.
- Check the histogram. When the aurora is bright and moving fast, shorten the exposure to keep the structure in the curtains. When it is faint, lengthen it a little or raise the ISO.
- Lower the screen brightness to protect your night vision.
For a fuller walkthrough with a field-tested quick start, see our aurora photography settings guide.
Composition in the dark
Aurora photographs live or die by their foregrounds. Use leading lines such as a shoreline or a jetty, place boathouses or huts on a third, and leave generous sky. Snow reflects light and adds a subtle color cast across the whole scene, while open water gives mirrored reflections, so choose the surface that suits your idea. In the daytime, check the fjord surface before choosing a position for mountain reflections, because a ruffled surface kills the mirror.
A four-night plan for photographers
A realistic schedule gives you flexibility without wasting days:
- Night one: Telegrafbukta or Prestvannet to test settings and check gear in the cold.
- Day two: a daylight drive to Ersfjordbotn at golden or blue hour, scouting boathouse compositions for later.
- Night two or three: whichever fjord the cloud forecast favors. Choose Grøtfjord on a modest night and Ersfjordbotn on a strong one.
- Spare night: keep one in reserve for the best weather window. It is the cheapest insurance you can buy.
The same planning method, scouting by day and shooting by night, works from Norway's Lofoten Islands to Iceland. Our Lofoten photography guide shows how we work out sunrise, tide and aurora angles on a Norwegian coast, and the workshop packing list covers batteries and cold-weather kit.
Bringing the Arctic home
If you are reading this because Norway's northern light is on your wish list, you may also enjoy seeing how it looks at gallery scale. Mark Gray's landscape prints include work from Norway, and the collection is available as limited edition and open edition prints. Our prints are made with panoramic medium format film and digital cameras for exceptional detail, and are collected in 35 countries.
Browse the limited edition prints or the open edition prints. If you want to learn to make images like these yourself, our photography tours are small-group, with luxury arrangements, led by Mark Gray and his team of professional photography instructors. A 1 day photography course or a private lesson is the place to practice night settings before you fly. A gift certificate, available from 50 AUD, suits the photographer in your life who dreams of the Arctic.
Our perspective
We have always believed that a great landscape image is made long before the shutter is pressed. It comes from choosing the right place for the right light, and then being patient enough to wait for it.
Tromsø is a perfect example. The city offers easy frames, but the pictures that stay with you come from the fjords, where mountains, water and sky line up. That takes scouting by day, flexibility at night and a camera you know so well that you can change settings with cold hands in the dark.
That is the thinking behind our small-group workshops, and it is why we shoot panoramic medium format film and digital cameras: detail and quality that reward a large print. We are proud that the work has been collected in 35 countries, and we love hearing from photographers who tell us a trip changed how they see.
If Norway is on your list, plan it like a photographer, and let us help you bring home something worth hanging.
Mark
FAQ
What is the best place to photograph the northern lights near Tromsø?
For most photographers, Grøtfjord on Kvaløya is the strongest all-round choice because it faces north and has a beach and jagged peaks for the foreground. Ersfjordbotn is the mirror-reflection favorite on stronger nights. If you have no car, Telegrafbukta is the easiest option from the city.
When is the best time of year to photograph Tromsø?
The aurora season runs from late August to early April, with the best hours usually in the late evening. February and March are popular because they combine dark nights with returning daylight for landscapes. Late May to late July suits midnight sun photography instead.
What camera settings should I use for aurora photos?
Use manual mode, manual focus on a distant star, ISO 1600 to 3200, your widest aperture and 5 to 15 seconds, with a tripod and remote release. Adjust from there: shorter when the aurora moves quickly, longer when it is faint.
Do I need a car to photograph around Tromsø?
You can reach Telegrafbukta, Prestvannet and the Fjellheisen cable car without one. The fjord locations on Kvaløya, such as Ersfjordbotn and Grøtfjord, are reached by car with winter tires. Always share your plans and return time with someone.
Can I photograph the aurora from the city itself?
Yes, on strong nights you can capture it from Tromsøya, and Telegrafbukta is the usual choice because it faces away from the center. Light pollution reduces contrast, so the fjords give cleaner results.
Sources
- Visit Tromsø: Northern lights, when and where
- Visit Tromsø: How to photograph northern lights
- Visit Norway: How to photograph the northern lights
- Fjordscout: Northern lights from Tromsø city
- Fjordscout: Best spots for northern lights near Tromsø
- Your Photostart: Photo spots Tromsø
- GoTromsø: Tromsø photography spots
- Tromso App: Best photo spots in Tromsø
- Penguin Trampoline: Northern lights in Norway
- Tromsø Norway Tours: Best photo spots for northern lights