
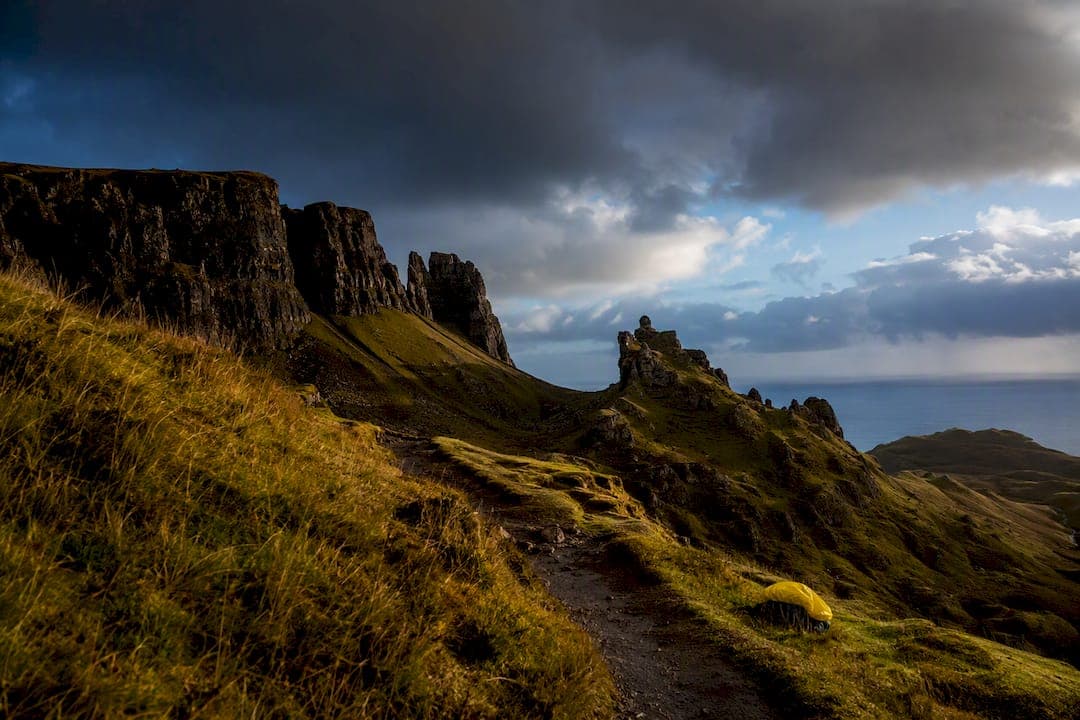
Prioritize the Old Man of Storr, the Quiraing, Neist Point, the Fairy Pools, and Sligachan, and you will cover the island's most rewarding light and terrain in a single trip. Arrive well before sunrise, pack a sturdy tripod, ND and graduated ND filters, and a versatile 17mm to 200mm lens kit, and you'll be ready for anything Skye's weather throws at you. If your visit is short, or you want to sharpen your technique fast, a guided Isle of Skye photography workshop compresses years of local knowledge into a few days.
TL;DR:
- Shooting at Old Man of Storr and Quiraing is best at sunrise, requiring early arrival to avoid crowds and capture optimal east-facing light.
- Neist Point is ideal for sunset shots, but strong wind and a steep climb mean caution and steady composition are essential.
- Cloudy weather enhances the Fairy Pools’ color and detail, making overcast days preferable over bright, direct sunshine for these locations.
- Tidal timing at Elgol and Talisker Bay influences composition, with low tide exposing foreground rocks and sand for more dramatic images.
- Using a lens range from 17mm to 200mm and sturdy tripod is crucial to adapt to Skye’s varied terrain and weather conditions for sharp, well-exposed shots.
Table of Contents
- Best Isle of Skye Photography Locations to Shoot First
- When Should You Shoot Each Skye Location?
- Gear and Camera Settings Built for Skye
- How Do You Compose Strong Shots on Skye's Terrain?
- Logistics: Driving, Safety, and What to Pack
- Should You Book a Skye Photography Workshop?
- Skye Doesn't Hold Still, and Neither Should You
- Learn Faster With Guided Skye-Style Instruction and Curated Prints
- Planning Tools Worth Bookmarking
- Sources
- FAQ
Best Isle of Skye Photography Locations to Shoot First
Skye rewards photographers who plan by location rather than by clock. Each site below has its own personality, its own best light, and its own crowd problem, so treat this as a working itinerary rather than a checklist to rush through.
Old Man of Storr
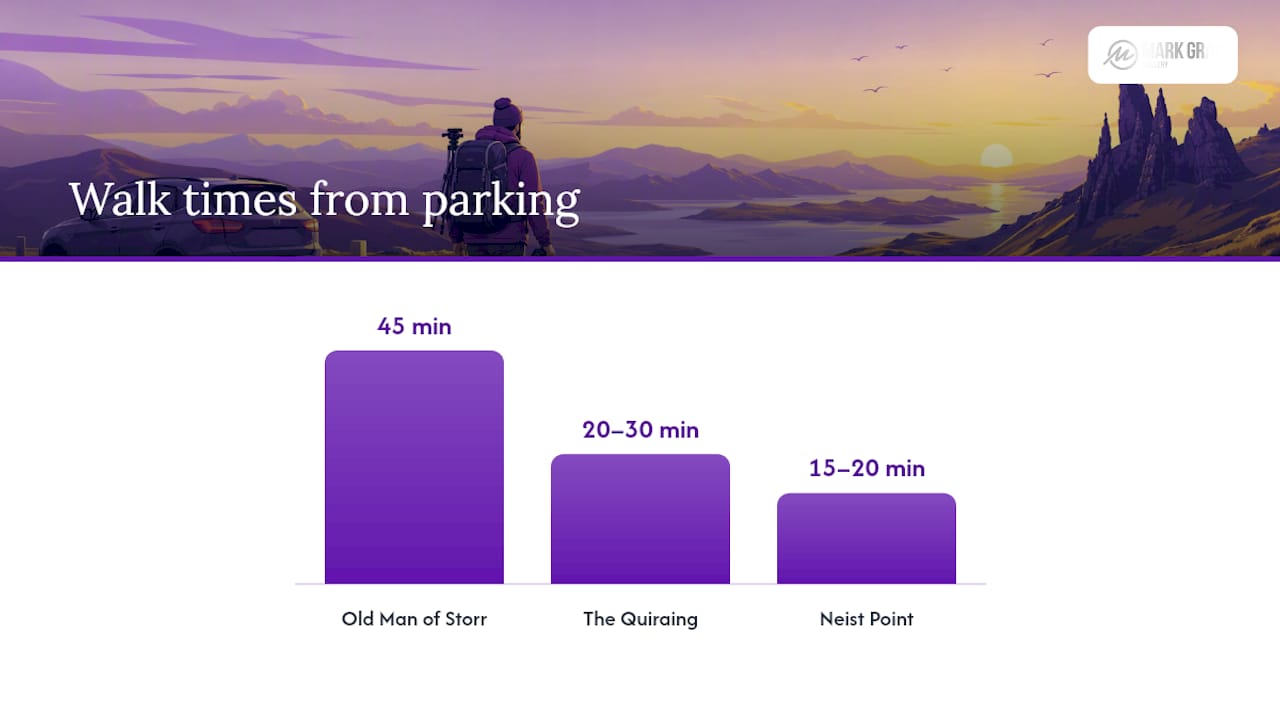
This jagged basalt pinnacle is arguably the most photographed rock formation in Scotland, and for good reason. The hike from the A855 car park takes about 45 minutes at a steady pace, gaining height quickly on a well-worn but rocky trail. Shoot at sunrise, when low side-light rakes across the pinnacle and separates it from the sky. Parking fills fast in summer, so arriving in darkness solves two problems at once: light and crowds.
- Why shoot it: Dramatic vertical rock formations set against rolling hills and, on clear days, views out to Raasay.
- Best light: Sunrise, especially with broken cloud for texture.
- Access: 45 minute uphill walk from the roadside car park; sturdy boots recommended.
- Composition tip: Shift left or right of the main viewpoint to place the Old Man off center, using a boulder or heather patch as foreground weight.
The Quiraing
The Quiraing is a slow-moving landslip on the Trotternish Ridge, and its folded, layered slopes look almost sculpted. The escarpment faces east, which makes it a natural sunrise location, with the rising sun catching the ridge lines while the valley floor stays in shadow for contrast. Parking at the small roadside layby near the trailhead is limited, so early arrival matters as much for a parking spot as for light.
- Why shoot it: Layered ridgelines and the famous Prison and Table rock formations.
- Best light: Sunrise, side-lit ridges.
- Access: 20 to 30 minutes of walking to the main viewpoints, longer for the full loop.
- Composition tip: Use the winding path itself as a leading line toward the Prison formation.
Neist Point
Skye's westernmost tip is built for sunset, with a lighthouse perched below dramatic cliffs. It's also one of the windiest spots on the island, so cliff-edge caution isn't optional. The walk from the car park down to the lighthouse viewpoint is short, maybe 15 to 20 minutes, but the return climb is steeper than it looks in fading light.
- Why shoot it: Clean lighthouse silhouette, layered cliffs, wide open western horizon.
- Best light: Sunset.
- Access: Short walk from parking, but exposed to strong wind.
- Composition tip: Include a foreground rock ledge to add depth between camera and lighthouse.
Fairy Pools
Clear turquoise pools fed by waterfalls beneath the Black Cuillin. Counterintuitively, these perform best under overcast skies, since flat, diffused light keeps the water's color from blowing out and avoids harsh reflections on the surface.
- Why shoot it: Turquoise water, small waterfalls, dramatic mountain backdrop.
- Access: 20 to 45 minutes of walking depending on which pool you target; the path is uneven and can be muddy.
- Composition tip: Get low, close to the water's edge, to make the pool's color the dominant element.
Sligachan
The old stone bridge at Sligachan with the Cuillin range behind it is a classic composition, and the river here often produces still, mirror-like reflections in calm conditions.
- Why shoot it: Iconic bridge silhouette with reflected mountains.
- Best light: Early morning or late evening for calmer water and warmer tones.
- Composition tip: Try both a wide frame including the full bridge arch and a tighter telephoto crop on just the reflection.
Elgol and Talisker Bay
Elgol looks across Loch Scavaig to the Cuillin and offers excellent foreground rock patterns at low tide, while Talisker Bay brings dark sand, a waterfall, and a sea stack into one frame.
- Why shoot it: Foreground texture paired with a serious mountain backdrop.
- Best light: Late afternoon and sunset.
- Composition tip: Walk the shoreline slowly. Small shifts in position change which foreground rocks line up with the peaks.
Portree
The harbor town's pastel-colored houses make for a gentler, more colorful subject after a day of moody mountain light.
- Why shoot it: Colorful waterfront buildings and working harbor.
- Best light: Blue hour, when window lights and streetlamps balance the sky.
Duntulm, Dunvegan, and loch viewpoints
Duntulm Castle's ruins sit dramatically above the sea, and the wider Dunvegan and Trotternish loch country offers still-water reflection opportunities away from the crowds.
- Why shoot it: Castle ruins with sea backdrop; quiet loch reflections.
- Composition tip: For loch reflections, try both a wide-angle frame and a short telephoto crop without changing position, so you leave with more than one usable image.
When Should You Shoot Each Skye Location?
Skye's light changes fast, and matching your schedule to each location's aspect makes the difference between a flat snapshot and a genuine keeper.
- Storr and Quiraing, sunrise. Both face east, so plan to be at the trailhead 60 to 90 minutes before sunrise during peak season. That buffer covers the hike, setup time, and a buffer against the inevitable wrong turn in the dark.
- Neist Point, sunset. The lighthouse and cliffs face west, and the last 30 minutes of light before the sun drops is usually the strongest window.
- Fairy Pools, midday to afternoon under cloud cover. Skip bright sun here; check the forecast and go when skies are flat and gray.
- Elgol and Neist Point tides. Both benefit from checking tide tables before you go, since low tide exposes more foreground rock and sand at each. Cross-reference conditions with a UK tide table site before setting out.
- Seasonal daylight shifts. Summer gives you sunrise before 5:00 AM and sunset after 9:00 PM, which means long shooting days but also long waits between golden hours. Winter compresses everything into a short window between roughly 9:00 AM and 4:00 PM, with lower sun angles all day, which some photographers actually prefer for constant side-light.
- Crowd timing. Storr and Quiraing car parks fill by mid-morning from spring through early autumn. Shooting at dawn, or visiting in the shoulder months of April, May, September, and October, cuts crowds dramatically while still giving workable weather.
Gear and Camera Settings Built for Skye
A lens range around 17mm to 200mm covers nearly everything Skye asks of you, from the Quiraing's sweeping ridgelines to a compressed telephoto crop of a sea stack at Talisker Bay. A single zoom in that range, or two lenses covering wide and mid telephoto, keeps your pack light on long hikes.
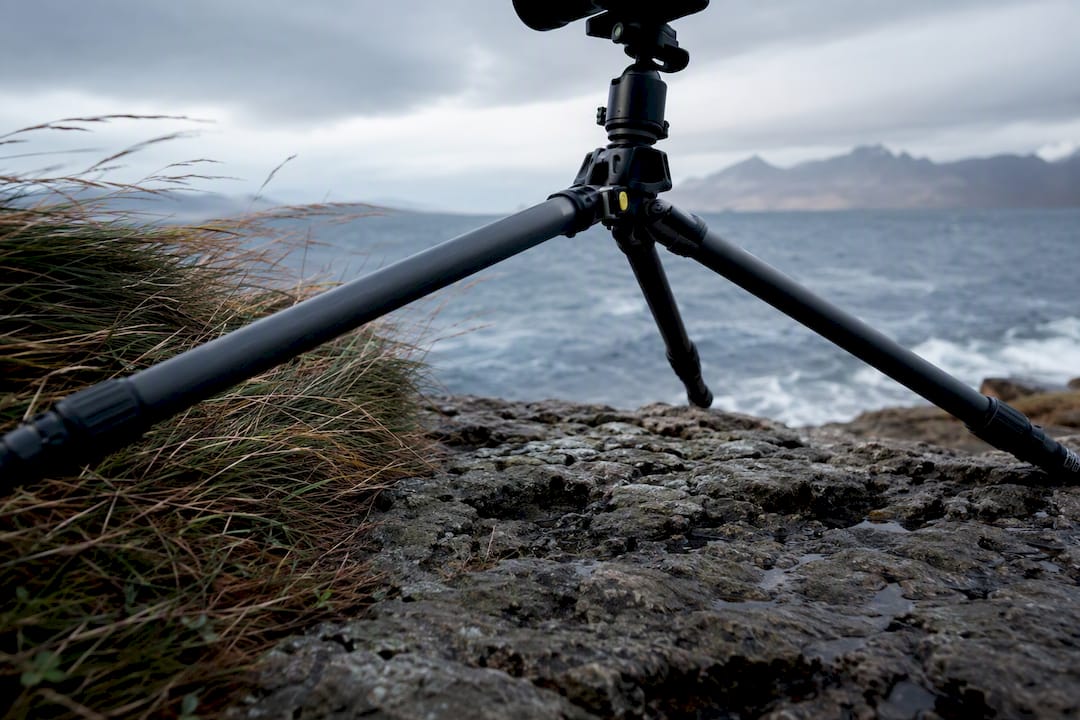
- A heavy duty travel tripod, not an ultralight one. Skye's coastal wind will shake a flimsy tripod even at 1/125 of a second.
- A 6-stop or 10-stop ND filter for waterfalls and seascapes where you want smooth, silky water.
- A graduated ND filter to hold detail in bright skies over dark foreground rock, common at Neist Point and Elgol.
- Spare batteries. Cold, wind, and long exposures drain batteries faster than most photographers expect.
- Lens cloths and a rain cover, since sea spray at Neist Point and Elgol travels farther than it looks.
For handheld shots, the rule of thumb is to keep your shutter speed at least twice your focal length's reciprocal. At 100mm, that means staying above 1/200 of a second unless you're on a tripod. For waterfall shots at the Fairy Pools, start around 1 to 4 seconds for a balance of motion blur and detail, and extend toward 8 seconds with a 6-stop ND if you want a fully smooth, misty look. For seascapes at Neist Point or Talisker, bracket three exposures a stop apart and blend them later if the sky is far brighter than the cliffs.
Pro Tip: Keep your tripod legs spread wide and set low to the ground in strong coastal wind. A lower center of gravity beats a taller, more elegant setup every time when gusts hit.
For a deeper breakdown of lens choices and filter kits, the landscape photography gear essentials guide covers the reasoning behind each item in more depth, and the ND filter explainer walks through exposure math for long exposures step by step.
How Do You Compose Strong Shots on Skye's Terrain?
Skye's volcanic and basalt formations photograph best when light rakes across them rather than hitting them head on. Side-lighting reveals texture in the rock that flat midday sun flattens into a gray mass, which is one more reason sunrise and sunset outperform noon almost everywhere on the island.
- Avoid centering your main subject. Place the Old Man of Storr, a sea stack, or the Quiraing's Prison formation on a rule of thirds intersection instead.
- Use foreground rocks, tide lines, or pools to anchor the frame. At Elgol or Talisker, a small shift of a few feet left or right can line up a completely different foreground rock with the Cuillin behind it.
- Match shutter speed to the mood you want in moving water. A 1 to 2 second exposure keeps some texture in waves or falls; push toward 6 to 8 seconds with an ND filter for a smoother, almost fog-like look.
- Watch the horizon line. On coastal shots, keep it level and consider placing it on the lower or upper third rather than dead center.
Pro Tip: At each location, try three frames before moving on: a wide shot with a strong foreground element, a mid telephoto detail shot isolating one feature, and a long exposure seascape or waterfall shot. That trio covers most of what a location has to offer.
The composition checklist guide is worth keeping on your phone as a quick field reference between locations.
Logistics: Driving, Safety, and What to Pack
Skye's main sights are connected by single-track roads with passing places, and etiquette matters as much as skill here. Pull into the nearest passing place on your left to let oncoming traffic through, and never park in one to shoot. Budget more driving time than a map suggests. The 45 minutes from Portree to the Quiraing trailhead can stretch during peak season traffic or livestock crossings.
- Footwear and hike prep. Storr and Quiraing trails are rocky and can be slick after rain. The Fairy Pools path is often muddy. Waterproof hiking boots with good ankle support beat trainers every time.
- Weather safety. Pack a compressible waterproof jacket even on a sunny morning. Skye's weather shifts quickly, and a clear sunrise can turn to horizontal rain within the hour.
- Pre-dawn essentials. A headtorch with a red-light mode preserves your night vision and keeps you from blinding other photographers already set up.
- Gear protection. A microfiber cloth for sea spray, a rain cover for your camera body, and a dry bag for spare lenses cover most of what Skye's coast will throw at your kit.
Quick packing checklist: waterproof jacket and boots, headtorch, tripod, ND and graduated ND filters, spare batteries, lens cloths, rain cover, dry bag, offline maps or a downloaded route.
Should You Book a Skye Photography Workshop?
Self-guiding Skye works well if you have time to scout, fail, and try again. If you're visiting for just a few days, or you want to shortcut months of trial and error, a structured photography workshop or tour on Skye compresses that learning curve fast.
Programs generally fall into a few formats:
- Half-day or one-day sessions focused on a single skill, like long-exposure technique or composition, usually built around one or two locations.
- Multi-day tours that string together several key locations across the island, timed around sunrise and sunset light.
- Private mentoring for photographers who want one-on-one feedback on their own images and shooting style.
When comparing options, look for a small group size so you get real instructor attention, a guide with genuine local knowledge of Skye's access points and light patterns, and a program that includes image review rather than just location-hopping. Ask how the itinerary handles a bad-weather day. A well-planned trip has a backup location or shifted schedule ready, not a canceled morning.
A guided option makes the most sense on a short visit, when you want faster access to less obvious viewpoints, or when you're trying to break a plateau in your own technique.
Skye Doesn't Hold Still, and Neither Should You
Skye is not a static backdrop. The Quiraing itself is a landslip that keeps creeping downhill, and the island's weather can swing from still and golden to sideways rain in under an hour. That instability is exactly what makes the place worth photographing again and again.
I've spent enough time leading groups through the Mark Gray Gallery's workshops and reviewing thousands of student images to notice a pattern: the photographers who get the memorable shot are rarely the ones parked at the obvious viewpoint at the obvious hour. They're the ones who walked another hundred meters down the ridge, or waited out a squall for the light that came after it.
Shoot the postcard locations. Then keep walking past them.
— Mark
Learn Faster With Guided Skye-Style Instruction and Curated Prints
If reading this guide has you itching to shoot moving water, dramatic side-light, and volcanic terrain properly, the fastest path there isn't more research. It's guided practice. Small-group instruction led by an experienced landscape photographer can provide hands-on feedback that helps overcome plateaus that a location guide alone can't fix.

If you want a focused, single-day push on technique, the 1-Day Photography Courses are built for exactly that. If you're planning a longer trip and want to build a real portfolio across multiple locations, the Photography Tours run as small, luxury-arranged groups with genuine local access and direct image feedback from Mark. For bespoke, one-on-one coaching, Private Lessons are worth exploring. And if you'd rather hang a finished, award-winning image than chase your own, browse the gallery's Limited Edition Prints, collected across 32 countries and produced from panoramic medium format film. Check current dates and availability for the courses and tours that fit your trip.
Planning Tools Worth Bookmarking
These resources support the fieldwork above. They're planning tools, not substitutes for scouting a location yourself.
- UK tide tables for checking low tide windows before shooting Elgol or Neist Point's foreground rocks.
- Met Office or a comparable UK weather service for hour-by-hour forecasts, since Skye's conditions change faster than daily forecasts capture.
- Traffic Scotland or local road advisories for single-track road closures, especially around the Quiraing after heavy rain.
- The Isle of Skye's own visitor guide, which covers access notes and seasonal conditions specific to the island.
If you're a working photographer looking to get your Skye portfolio in front of more clients, a photography-focused SEO service can help your images actually get found once you're home and editing.
Sources
- Skye photography locations Scotland | Finding the Universe
- Top Travel Photography locations in Isle of Skye | Visual Wilderness
- Skye photography guide | Isle of Skye official
- Isle of Skye: Old Man of Storr and the Quiraing | 37 Frames
FAQ
What Are the Best Places to Take Pictures on the Isle of Skye?
The Old Man of Storr, the Quiraing, Neist Point, the Fairy Pools, and Sligachan cover the island's strongest combination of light, terrain, and access. Elgol, Talisker Bay, Portree, and Duntulm Castle round out a longer itinerary with quieter, less crowded compositions.
What Is the Rule of Thirds in Photography?
The rule of thirds divides a frame into a 3 by 3 grid and suggests placing key subjects, like a horizon or a rock pinnacle, along those grid lines rather than dead center. On Skye, this means keeping the Old Man of Storr or the Quiraing's Prison formation off center, which creates more visual depth than a centered composition.
What Is the Most Photographed Spot in Scotland?
The Old Man of Storr on Skye is widely considered one of Scotland's most photographed landscape features, thanks to its dramatic silhouette and relatively short, 45-minute hike from the roadside car park. The Quiraing runs a close second for the same reasons: striking terrain paired with manageable access.
What Movie Was Filmed on the Isle of Skye?
Skye's dramatic scenery has appeared in several major productions, most notably scenes in Prometheus filmed near the Quiraing. The island's otherworldly terrain regularly draws film crews looking for landscapes that feel like nowhere else on Earth.
Do I Need a Guided Workshop to Photograph Skye Well?
No, but a guided workshop shortens the learning curve considerably, especially on a short visit. Small-group photography tours give you local access knowledge, timing guidance, and direct feedback that self-guided trial and error can take years to match.