
New Zealand's North Island packs black-sand surf beaches, ancient redwoods, geothermal pools, sea arches and active volcanic country into a landmass you can cross in a few days. For a landscape photographer, the challenge is not finding subjects. It is choosing which to chase, at what hour, and in which weather. This guide gives you the locations worth your time, the light that suits each, a realistic way to link them, and the safety checks that keep a good trip from going wrong.
TL;DR
- Build your trip around four subject types: the far north and west coast, the Coromandel, the Rotorua geothermal belt and the central volcanoes.
- Dawn suits Cathedral Cove, overcast skies suit the colored pools at Wai-O-Tapu, and summer is the pick for the Coromandel.
- Tongariro National Park is roughly a 4 to 5 hour drive from both Auckland and Wellington, so plan it as its own leg.
- Mountain weather changes within minutes. Check official forecasts and rules, including drone permits, before you go.
- We run small-group landscape photography tours and sell limited edition prints, so you can learn the craft with us or bring home a finished image.
Table of Contents
- Why the North Island rewards landscape photographers
- The far north and the west coast
- The Coromandel: arches, steam and soft light
- Rotorua and the geothermal belt
- The central volcanoes
- Planning a route
- Safety, permits and conditions
- A quick shot list by subject
- Our perspective: what we have learned from shooting landscapes worldwide
- Photograph the North Island with us, or bring the view home
- FAQ
- Sources
Why the North Island rewards landscape photographers
The South Island gets most of the attention, and we have written about it at length in our South Island photo spots guide. But the North Island offers something different: variety at short range. Within a morning's drive you can move from a lighthouse above two meeting seas to a native forest with waterfalls, then to steaming ground and a snow-capped cone.
That variety shapes how you should shoot it. A tripod, a neutral density filter and a wide lens do the heavy lifting on the coast and at waterfalls. A longer lens earns its place in the volcanic country, where compression helps you stack ridgelines and steam. Our landscape photography gear essentials list covers the kit in detail.

If you are comparing the whole country, our New Zealand landscape highlights guide puts both islands in context. This article stays north of Cook Strait.
The far north and the west coast
The top of the island is where the country feels most remote, and where the coastline does most of the work for you.
Cape Reinga
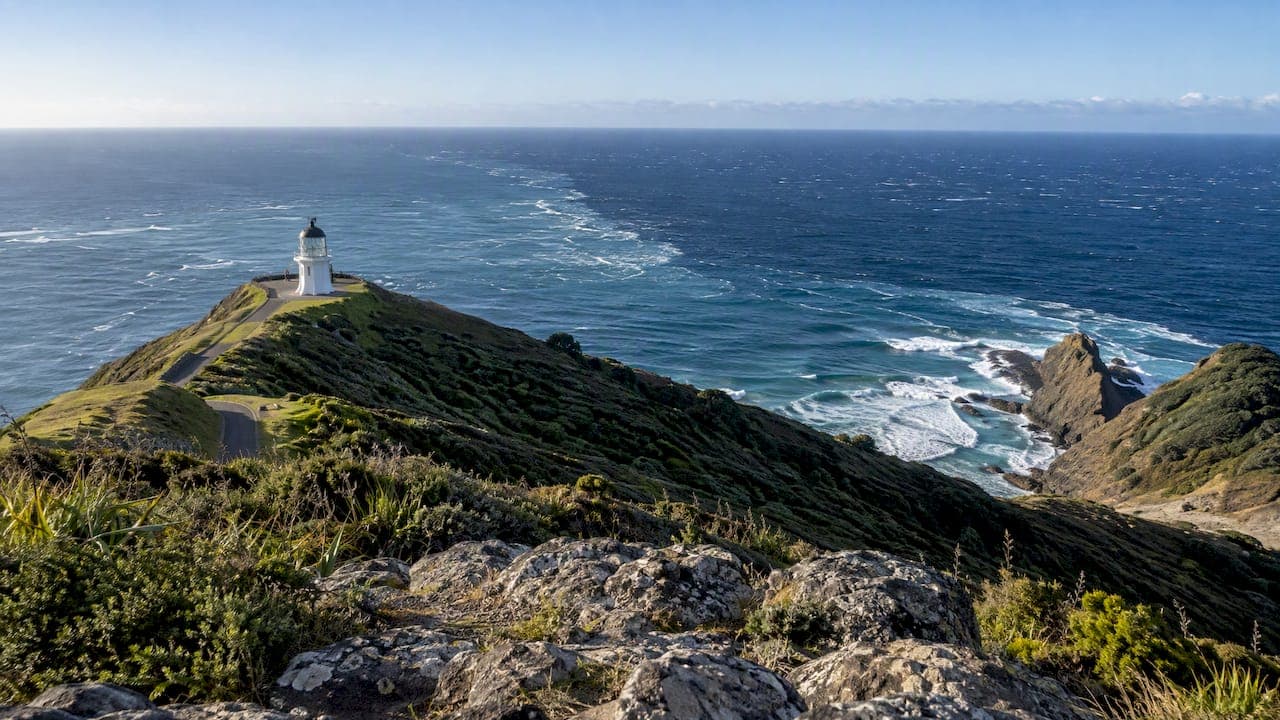
The lighthouse at Cape Reinga is a classic subject, and the meeting of the Tasman Sea and Pacific Ocean gives you texture in the water that changes with the wind. A North Island spots guide lists the lighthouse and that ocean meeting point among its photographable coastal subjects. For us, the strongest frames here use the lighthouse as a small anchor in a wide, empty scene, rather than filling the frame with it.
Piha and the Auckland west coast
Piha Beach, with its black sand and Lion Rock, sits close enough to Auckland to shoot on a first or last day. The same guide highlights both, and the dark sand is the reason it works: wet sand at low light acts like a mirror for the sky, and the rock gives you a bold, simple shape to build around. Wash lines from receding waves make natural leading lines, so use a slower shutter speed to smooth the water while the sand keeps its detail.

Cape Brett and the Bay of Islands
Cape Brett is named among the native-bush settings in that guide, and the Bay of Islands also features in the official 15-day itinerary that runs from Kaitaia to Christchurch. That itinerary covers 2,215 km, takes in the Bay of Islands, Rotorua and Wellington, and crosses Cook Strait by ferry. It is a useful reminder of scale: the whole North Island is a journey in itself, and trying to shoot all of it in a week means spending most of that week in the car.
The Coromandel: arches, steam and soft light
The Coromandel Peninsula is where many photographers find their most reliable sunrise frames.
Cathedral Cove
Cathedral Cove's natural arch is listed in the guide's coastal subjects. For light, a photography guide recommends dawn or sunrise for the archway and sea stacks, and notes that low tide reveals more beach and foreground options. Check the tide table the night before. A low tide at first light is the combination to aim for, because it gives you wet sand, reflections and room to move.
Some practical thoughts from our own approach to coastal work:
- Arrive before the light, not with it. The blue hour before sunrise often gives the cleanest, calmest color.
- Frame through the arch, then turn around. The view back to the beach is often the stronger composition.
- Keep your filters and a microfiber cloth in a pocket. Spray finds every front element.
Hot Water Beach
At Hot Water Beach, geothermal water seeps through the sand at low tide. According to the same guide, the most interesting compositions come from steam rising from the beach at dawn, particularly in cooler months. This is a case where cold weather helps: more contrast between air and ground temperature means more visible steam.
When to go
The same guide singles out summer as the best season for the Coromandel. That fits the long daylight and warm water, but it also means more people at the popular spots, which is another reason to be there at dawn. For a broader view of how the seasons change what you can photograph, see our piece on how seasons change landscape photography.
Rotorua and the geothermal belt
This is the part of the North Island that looks least like anywhere else on earth, and it rewards slow, deliberate shooting.
Wai-O-Tapu
The vividly colored pools at Wai-O-Tapu are one of the best-known volcanic subjects on the island, and they appear in the North Island spots guide alongside Waimangu's geothermal lakes and boiling features and Te Puia's Pōhutu Geyser. On timing, the Artist's Palette photographs best in overcast conditions. That matches what we would expect: flat, even light keeps the saturated mineral colors from clipping, and a polarizing filter cuts the glare off the water so the colors read cleanly.

Whakarewarewa Redwoods
A photographer's account of the area describes redwoods reaching about 70 meters, with late-afternoon light creating shadows through the trunks. Treat the height as one traveler's description rather than a survey figure, but the lesson on light holds: in a tall forest, low sun is what creates the shafts and the depth.
After dark, the Treewalk changes character. It is illuminated with colored lanterns, which creates long-exposure opportunities. Use a tripod, a low ISO and a two-second timer or remote release to avoid shake.

Waterfalls and bush
Rotorua's Redwood Forest, Karekare Falls, Marokopa Falls and Bridal Veil Falls are all named among the forest and waterfall subjects in the spots guide, which describes Bridal Veil Falls as a 55-meter cascade. For moving water, our usual starting point is a shutter speed between half a second and two seconds, a circular polarizer to remove sheen from wet rock and leaves, and a position that keeps the falls off-center so the surrounding bush supplies scale.
The central volcanoes
Tongariro and the Emerald Lakes
Tongariro's Emerald Lakes and volcanic cones are listed among the island's volcanic subjects in the same guide. This is serious mountain country, and the weather there deserves respect, which we cover in the safety section below.
Taranaki
Te Papa-Kura-o-Taranaki is the other great volcanic subject, and a solitary cone is an ideal canvas for light. Our advice is to arrive with flexibility in your schedule: mountains like this are often hidden for days and then appear clear for an hour.
Hikurangi and the East Cape
For something quieter, Maunga Hikurangi stands 1,754 meters, is the highest non-volcanic mountain in the North Island and is recognized as the first point on the New Zealand mainland to greet the morning sun. For a photographer, that is an invitation to think about first light as the subject itself.
Mount Maunganui
The panoramic summit of Mount Maunganui, listed in the spots guide, suits a different kind of picture: a wide coastal view that works at both sunrise and sunset, with beach, harbor and sea in one frame.
Planning a route
Distances on a map look small. Driving time and light are what limit you, so plan fewer locations and more time at each.
| Leg | Distance or time | Source |
|---|---|---|
| Auckland to Taupō via State Highway 1 | About 278 km, 3.5 hours | New Zealand tourism |
| Auckland or Wellington to Tongariro National Park | About 4 to 5 hours by road | Department of Conservation |
| Auckland to Wellington by Northern Explorer | 648 km, runs in all months | New Zealand tourism |
A sensible week might run like this:
- Days 1 and 2: Auckland and the west coast, with Piha at low light.
- Days 3 and 4: Coromandel, based near Cathedral Cove and Hot Water Beach so you can be at both for sunrise.
- Days 5 and 6: Rotorua, with geothermal sites by day and the Redwoods Treewalk after dark.
- Day 7: Travel south toward Tongariro, allowing a buffer for weather.
If you prefer not to drive the whole way, the Northern Explorer train travels through the heart of the island with views of Ruapehu and Tongariro. For the national park itself, daily national buses serve Tongariro and nearby towns, and shuttle buses meet national buses and trains at Whakapapa Village and nearby towns. Flying a tripod and a full bag onto a bus is fine, but you lose the flexibility to chase a break in the cloud, so a rental car remains the choice for most landscape photographers.
Australian readers have it easy: the North Island is a short flight across the Tasman, and our guide to scenic drives in Australia will feel familiar in spirit. Just remember that you drive on the left in New Zealand, as at home.
Safety, permits and conditions
The best frames often come from places and times that carry real risk. Check these before you leave the car.
Mountain weather and the Tongariro Alpine Crossing
The Department of Conservation describes the Tongariro Alpine Crossing as a 19.4 km advanced winter trip that takes about 9 hours and requires alpine skills and experience. Ice can be expected on the track between April and October, and the winter hazards include snow, ice, avalanches and sub-zero temperatures. The same brochure says 38% of tramping injuries come from slipping and recommends tramping or mountaineering boots. That brochure is dated May 2019, so check the current DOC page for the latest advice before you go.
If your plan involves winter conditions on the Crossing, speak to a DOC visitor center or a qualified alpine guide first. A camera bag adds weight and changes your balance, and no photograph is worth a fall.
On the photography side, weather at altitude changes rapidly, and cloud can roll in and obscure everything within minutes. Carry rain gear and be ready to shoot in mist. Mist is not a failure. Layered ridges and soft shapes can make the strongest picture of the day. Our article on how weather shapes landscape photography explains how to use it.
Forecasts
For Tongariro, DOC provides access information and links to the NIWA weather forecast. For higher country, MetService's Brief New Zealand Mountain Forecast covers major North and South Island mountain areas above 800 meters and gives special emphasis to hazardous weather. Read both the evening before and again at breakfast.
Drones and flooding at Taranaki
At Te Papa-Kura-o-Taranaki, flying a drone without a permit is strictly prohibited. DOC also advises checking the forecast, carrying enough clothing and equipment for changing weather, and remembering that rivers and tributaries can flood at any time of year. Treat that as a general rule across the island's national parks: look up the specific permit rules for each place before you launch anything.
A quick shot list by subject
| Subject | Where | Light and technique |
|---|---|---|
| Sea arch | Cathedral Cove | Dawn, low tide, shoot through the arch and back |
| Steaming sand | Hot Water Beach | Dawn in cooler months, low tide |
| Colored pools | Wai-O-Tapu | Overcast sky, polarizer |
| Redwood forest | Whakarewarewa | Late afternoon for shadows, night for lanterns |
| Waterfalls | Karekare, Marokopa, Bridal Veil | Slow shutter, polarizer, off-center framing |
| Volcanic cones | Tongariro, Taranaki | Flexible schedule, expect mist |
Our perspective: what we have learned from shooting landscapes worldwide
We have photographed landscapes in Australia, New Zealand, Norway, Iceland, French Polynesia, Spain and the United Kingdom, and the lesson that repeats everywhere is that the location is only half the picture. The other half is patience. A place like Cathedral Cove or Wai-O-Tapu has been photographed thousands of times, and the images that stand out are the ones taken when the light, tide and conditions were right, not the ones taken because the schedule said so.
Our work is made with panoramic medium format film and digital cameras, and that shapes how we think about the North Island. A format that records fine detail rewards scenes with depth, such as a steaming shoreline or a layered forest, but only if you slow down enough to compose them. We would rather return to a single location three mornings in a row than tick off six in a day.
If you plan only one thing, plan buffer days. Weather in the volcanic country and on the Coromandel coast will not follow your itinerary, and the buffer is what turns a frustrating trip into a successful one. Our experience in places like Iceland and Milford Sound, which we cover in our Milford Sound photography guide, is that the most memorable images tend to arrive on the day after the weather you feared.
— Mark
Photograph the North Island with us, or bring the view home
If you would like to learn these techniques with guidance, our multi-day landscape photography tours are small-group, with luxury arrangements, and led by Mark Gray and his team of professional photography instructors. Tours run across Australia and worldwide. See our photography tours for the current destinations, or start closer to home with a 1 day photography course in Australia.
Prefer to collect rather than shoot? Our award-winning landscape prints are collected in 35 countries, and the range includes New Zealand. Browse the limited edition prints, or give a friend the choice with a gift certificate, available from 50 AUD.
FAQ
When is the best time of year to photograph the North Island?
It depends on the subject. Summer is the best season for the Coromandel, while cooler months help with steam at Hot Water Beach. Overcast days suit the colors at Wai-O-Tapu, and dawn is the preferred hour at Cathedral Cove, according to one photography guide.
How long do I need for a North Island photography trip?
A week lets you cover the west coast near Auckland, the Coromandel, Rotorua and the approach to Tongariro without rushing. Driving from Auckland to Taupō alone is about 278 km and 3.5 hours, so add buffer days for weather and tides.
Do I need a permit to fly a drone?
In some places, yes. At Te Papa-Kura-o-Taranaki, flying a drone without a permit is strictly prohibited. Check the Department of Conservation page for each park before you fly.
Is it safe to photograph around Tongariro in winter?
Only with the right skills and equipment. The Department of Conservation describes the winter Crossing as an advanced trip requiring alpine skills and experience, with hazards such as ice and avalanches. If you are unsure, speak to a DOC visitor center or a qualified guide.
Sources
- Maunga Hikurangi, 100% Pure New Zealand
- The Ultimate Guide to the North Island's 30 Most Instagrammable Spots
- New Zealand Photography Guide: Fiords to Volcanoes
- Travel photography New Zealand North Island
- Tongariro National Park, Department of Conservation
- Northern Explorer Train
- North Island Golf Highlights Itinerary
- Top of the North to Top of the South Itinerary
- Te Papa-Kura-o-Taranaki, Department of Conservation
- Tongariro Alpine Crossing winter brochure
- National Parks Information, MetService