
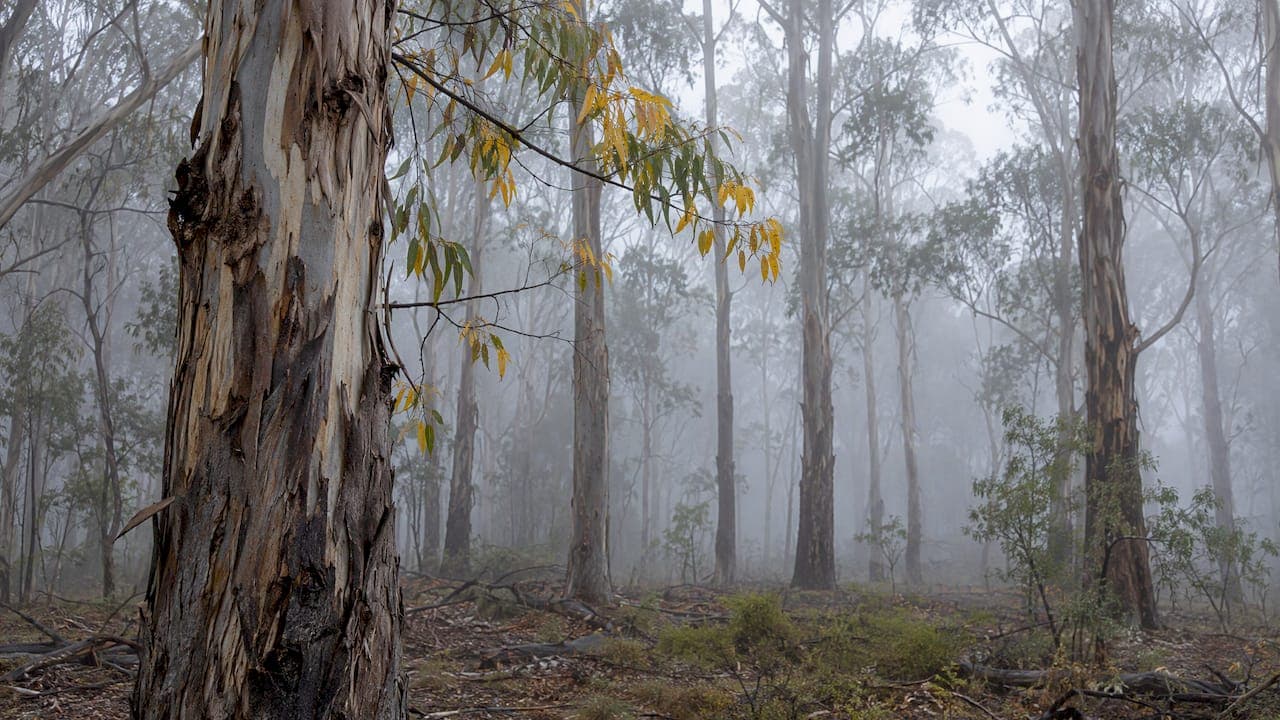
Misty landscape photography rewards patience and planning. Mist works because it strips colour and contrast from a scene, simplifies it and separates it into layers. To shoot it well, you need to predict where it will form, arrive before first light, expose for pale tones and build your frame in planes: crisp foreground, softened middle, almost vanished background. This guide takes you through each step, with Australian conditions in mind.
TL;DR
- Mist forms when air near the ground cools and water vapour condenses. Clear skies, very light wind and moisture favour it, so check the forecast the night before.
- Be in position 30 to 45 minutes before sunrise and stay for the "burn off", when mist thins and light breaks through.
- Expose brighter than your meter suggests, check the histogram and use a tripod.
- Compose in layers: a sharp foreground, a muted middle ground and a faint background create depth.
- Poor visibility is a safety issue on the road and on the track. Keep to formed paths, dress for cold and wet, and tell someone where you are going.
Table of Contents
- Why mist transforms a landscape
- How to predict mist and choose your location
- Camera settings and equipment for misty scenes
- Composition: building depth out of nothing
- Staying safe in poor visibility
- Our perspective
- Take your misty mornings further
- FAQ
- Sources
Why mist transforms a landscape
A clear day shows everything, and that is often the problem. Telegraph poles, distant roads and cluttered hillsides all compete for attention. Mist removes them. By reducing colour and contrast, a thin veil of mist or fog simplifies the scenery and transforms it in a way few other conditions can. Whether that page is the one to read first matters less than what it points to: subtraction is the whole idea.
The physics helps you plan. Cambridge in Colour describes fog as a natural softbox: water droplets scatter light, which lowers contrast, dims the scene and can even reveal visible rays when light comes from a strong directional source such as the sun. That is why a misty sunrise can feel both quiet and dramatic.
There is also a lesson here about weather in general. Australian Geographic's rainforest advice makes the point that overcast and wet weather can be an advantage, because moisture and cloud soften the light and reveal atmosphere. If you want a broader view of how conditions shape a frame, our piece on how weather shapes your landscape photography covers storms, cloud and light together.
Mist or fog: does it matter?
Photographers use the words almost interchangeably, and so do searchers. Meteorologists separate them by visibility, but for your purposes the difference is practical: thin mist keeps shapes and colour and glows beautifully with backlight, while thick fog erases the background entirely and suits minimal, graphic compositions. Treat both as the same opportunity and adjust your composition to how much is visible.

How to predict mist and choose your location
Good misty photographs are rarely accidents. The Bureau of Meteorology explains that fog and mist form when air near the ground cools and water vapour condenses, and that clear skies, very light winds and plenty of moisture favour it. So the ideal forecast is a still, cloudless night after a damp period.
The same page notes that fog can sit isolated in valleys after a warm day followed by a cool night. That is your cue to look for a high vantage point above a valley, river flat or lake. From just above the fog layer, looking west can also reveal a fog bow.
A simple pre-shoot checklist
- Check the forecast the evening before. Look for light wind, low overnight temperatures and a small gap between the overnight low and the dew point.
- Choose terrain that holds mist. Valleys, river corridors, lakes, dams and low paddocks collect cool air.
- Pick a vantage point with layers. Ridgelines, tree rows, fences and jetties give the mist something to wrap around.
- Scout in daylight. Knowing where the track goes, and where the edges are, makes the pre-dawn walk far safer.
- Have a backup. If the mist does not form, a clear sunrise over the same layered terrain is still worth shooting.
Rainforest, alpine and coastal mist
Australian Geographic recommends visiting rainforest in the early morning, because cooler air and moisture can produce mist, while overcast conditions act as a diffuser that reduces harsh highlights and deep shadows. That makes the wet tropics, Tasmanian forests and the Great Ocean Road hinterland natural candidates.
Mountain country is another favourite. Valleys below escarpments can fill overnight, and cloud can even pour over a ridge. ABC News reported that so-called cloud waterfalls need clear nights, cool conditions, little wind and suitable topography and are usually seen in the early hours, as climbers on Bluff Knoll in Western Australia found. If the Blue Mountains are on your list, our guide to a Blue Mountains photography workshop explains what to expect from that landscape.
Season matters too. Autumn and winter mornings tend to produce the coolest nights, and we look at the wider pattern in how seasons change landscape photography.
Timing: sunrise and the burn-off
Great Walks recommends arriving 30 to 45 minutes before sunrise, and notes that strong colour can appear before the sun rises and again 10 to 20 minutes after it appears. In mist, the second window is often the best. As the sun warms the air, the mist thins, begins to move and lights up from behind. Photographers call this the burn-off, and it is when the beams, glowing layers and soft shapes appear. Do not pack up when the sun clears the horizon.

Camera settings and equipment for misty scenes
Mist is forgiving in some ways and difficult in others. The difficulty is exposure. A camera meter sees a large pale area and tries to turn it into mid grey, which can leave misty photographs dull and muddy.
Exposure
- Add positive exposure compensation. A common starting point is somewhere between +0.7 and +1 stop, adjusted to the scene. Review each frame rather than trusting a single setting.
- Read the histogram. You want the data pushed towards the right without clipping the brightest highlights, especially around the sun.
- Shoot RAW. Soft, low-contrast scenes hold subtle tonal differences that you will want room to refine later.
- Keep ISO low. Smooth gradients in mist show noise readily, and a tripod makes low ISO practical.
Lenses, filters and support
Australian Geographic recommends wide-angle lenses when you want to exaggerate perspective, include the environment or shoot upward from a low angle. In open landscape, the opposite tool is just as valuable. A long lens compresses the layers so that ridges and trees stack on top of each other, each one paler than the last.
The same article recommends a polarising filter to reduce glare on water and boost foliage saturation, and a tripod for dark rainforest scenes shot around f/11 to f/16. A tripod also allows longer exposures: Canva suggests long exposures to blur moving mist against static elements, which gives drifting fog a silky quality.
Focus and moisture
Autofocus can hunt in low-contrast scenes. Focus on a sharp edge such as a branch or fence post, or switch to manual focus and magnify the live view. Carry several lens cloths, because droplets will gather on the front element. A rain cover for the camera is sensible, and so is keeping the lens hood on.
| Situation | Suggested approach |
|---|---|
| Thin mist, backlit sunrise | Shoot towards the light, add exposure compensation, protect highlights |
| Dense fog, no background | Go minimal: one tree, one jetty, one boat, lots of negative space |
| Layered valley from a lookout | Long lens, stack the ridges, f/8 to f/11 on a tripod |
| Moving mist over water | Tripod, low ISO, longer exposure to smooth the movement |
| Dark forest interior | Wide lens, tripod, around f/11 to f/16, polariser to manage glare |
Composition: building depth out of nothing
In mist, depth comes from tone rather than from sharpness. DPReview explains that successful fog images commonly progress from a crisp foreground through a subdued middle ground to a barely visible background, creating spatial relationships without relying only on converging lines. In other words, each plane loses a little contrast, and the viewer reads that as distance.
Canva's advice lines up with this: layer near, middle and background subjects, and use backlighting or light near the edge of the frame to add focus and mood.
Practical composition ideas
- Anchor the frame. Place one dark, well-defined subject, such as a tree, a rock or a fence, in the foreground.
- Repeat shapes. A row of poplars, power poles or fence posts fading into white is a ready-made rhythm.
- Leave space. Negative space is part of the subject. Do not crop in too tightly.
- Look for a focal point. A lone boat, a figure with an umbrella, a light in a window: one small element gives the eye a place to rest.
- Shoot towards the light. Backlit mist glows, while front-lit mist looks flat.
- Try monochrome. When colour is almost absent anyway, black and white can strengthen the tonal layers. Our article on the role of post processing in landscape photography explains how to refine tone and contrast without losing the mood.
Finishing the image
Keep edits gentle. A small lift in contrast, a touch of clarity on the foreground and a careful white point are usually enough. Over-processing turns soft mist into grey haze. The goal is for the image to feel like the morning did.
Staying safe in poor visibility
The conditions that make beautiful photographs also reduce your margin for error.
On the road. RACV advises slowing down and increasing your following distance, using demisters, avoiding high beams in fog because reflected light can worsen visibility, and pulling over safely when visibility becomes inadequate. Pre-dawn drives to a vantage point are where most photographers take their biggest risk. If you are planning routes, our scenic drives photography guide can help you choose locations with safe places to stop.
On the track. The Blue Mountains National Park Guide suggests not committing to steep or unfamiliar cliff-edge walks when fog compromises visibility and footing. Choose short, formed paths, and check official park alerts and track notes before you leave.
In the cold and wet. Australian Photography advises carrying warm, waterproof clothing and footwear, along with lens cloths and camera rain protection, and telling someone where you are going, because cameras can fail in wet and freezing conditions.
With drones. CASA's rules, as summarised by this Australian park guide, say a drone must not be flown through fog or in conditions that stop you seeing it. Recreational pilots must keep visual line of sight and follow park restrictions. Mist and drones do not mix.
Our perspective
Mist is the closest thing landscape photography has to a gift. You cannot order it, and you cannot schedule it, but when it arrives, the whole scene is edited for you.
After years behind panoramic medium format film and digital cameras, I have learned that the most valuable thing in misty conditions is not a piece of equipment. It is being in place early, with the composition already worked out, so that when the light breaks through the layers you can respond rather than search.
That is also why we run our workshops as small groups led by me and our team of professional photography instructors. Misty mornings are fleeting, and one-to-one attention in the field matters. Time on location, with someone beside you reading the light, is the quickest way to improve.
The same qualities that make a misty frame work, restraint, tonal depth and a sense of quiet, are what we look for when we produce limited edition prints. A well-made print lets those soft gradations breathe in a way a screen cannot.
Mark
Take your misty mornings further
If you would like to learn this in the field, our 1 day photography courses across Australia are a practical starting point, and our multi-day photography tours take small groups to some of the world's most atmospheric landscapes with luxury arrangements. Prefer a tailored session? Private lessons are also available. Prices are listed on the course pages.
If misty scenes are what you want on your wall, explore our limited edition landscape prints or browse the wider Mark Gray Gallery. Our guide to gallery quality landscape prints shows what to look for, and our prints by region page helps you find a scene that suits your space.
FAQ
What is the best time of day for misty landscape photography?
The hour around sunrise is best, because the air is at its coolest and mist is most likely to be present. Arrive 30 to 45 minutes early, and stay after the sun appears, as the burn-off often produces the most luminous light.
What settings should I use for foggy landscapes?
Shoot RAW on a tripod, keep ISO low and use a small positive exposure compensation so the mist stays bright rather than grey. Check the histogram and protect the highlights. Around f/8 to f/11 suits most layered scenes, and f/11 to f/16 suits dark forest.
How do I know if it will be misty?
Look for a clear, still night after a damp period, with cool temperatures. The Bureau of Meteorology notes that clear skies, very light winds and sufficient moisture favour fog and mist. Valleys, lakes and river flats are the likeliest places to find it.
Is it safe to photograph in fog?
It can be, with preparation. Drive slowly, avoid high beams, stick to short formed paths, dress for cold and wet weather, check park alerts and tell someone your plans. Do not fly a drone in fog.
Can I learn misty landscape photography on a workshop?
Yes. We offer 1 day courses in Australia and multi-day tours in Australia and overseas, led by Mark Gray and our team of instructors. Weather is never guaranteed, but you will learn to plan, expose and compose for atmospheric conditions.
Sources
- Photographing Mist in the Landscape, Australian Photography
- Taking Photos in Fog, Mist or Haze, Cambridge in Colour
- Photographing the forests, Australian Geographic
- How to take great weather photos, Bureau of Meteorology
- Cloud waterfalls at Bluff Knoll, ABC News
- How to photograph a sunrise, Great Walks
- Demystifying fog: a photographer's guide, DPReview
- Photographing mist and fog, Canva
- Driving in poor visibility conditions, RACV
- Blue Mountains weather: what to pack
- The chill factor: Australia's alpine regions, Australian Photography
- Drones in Australian Parks and Reserves