
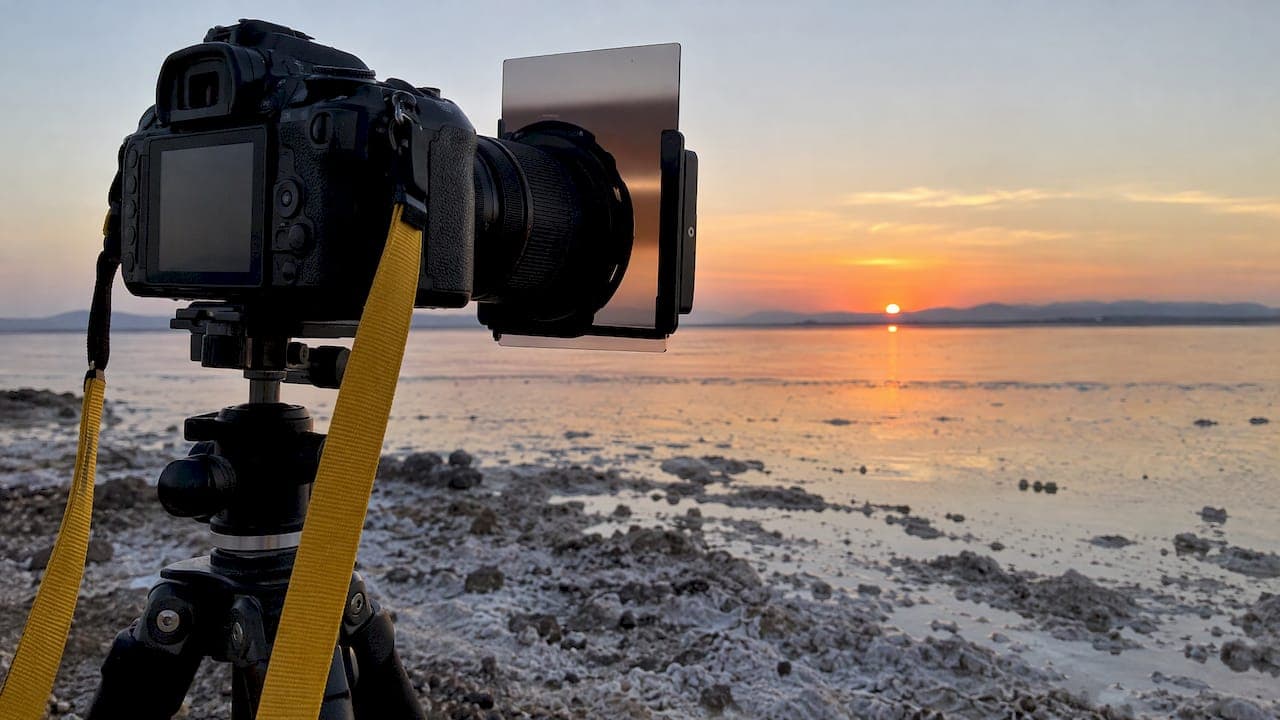
A reverse graduated ND filter is darkest in the middle and fades lighter toward the top, so it tames the bright band of sky right at the horizon when the sun is low. A standard graduated filter is darkest at the top edge instead. That single difference makes the reverse grad the specialist tool for sunrise and sunset over flat horizons such as the ocean, salt lakes and open plains. Below, you will find how it works, which strength to choose, how to meter and position it, and where it fails.
TL;DR
- A reverse grad is darkest at its center and lightens toward the top, while a standard grad is darkest at the top edge (NiSi).
- It suits sunrise and sunset with the sun at or just below the horizon, and works best over a relatively flat horizon.
- Pick strength by metering: measure the foreground, then the sky, and aim to bring both within about one stop.
- Mountains, buildings and trees that rise above the horizon will be darkened, so switch to exposure blending when the skyline is busy.
Table of Contents
- What a reverse graduated ND filter actually does
- When a reverse grad earns its place in your bag
- Choosing strength: how many stops do you need?
- Positioning the filter in the holder
- Exposure tips that make the filter work harder
- Reverse grad or exposure blending?
- A field checklist for your next coastal sunrise
- Our perspective
- Learn it on location
- Frequently asked questions
- Sources
What a reverse graduated ND filter actually does
Every graduated neutral density filter is a piece of glass or resin with a dark section and a clear section. The way the density is arranged defines the filter.
A standard graduated ND has a darker upper section and a clear lower section. You position the dark part over the sky and the clear part leaves the foreground largely unaffected, as PetaPixel explains. It is the right tool when the brightness fades gradually from the top of the frame down, which is typical of a midday or overcast sky.
A reverse grad flips the logic. Its darkest band sits in the middle of the filter, and the density lightens toward the top. Digital Camera World describes it as darkest close to the horizon, with a lighter area toward the top of the frame. Put the dark band on the horizon and the glowing strip of sky where the sun sits is held back, while the upper sky, which is already darker, is left with less filtration.

The problem it solves is a specific luminance pattern. When the sun is low or just under the horizon, the brightest light is concentrated in a narrow strip along the skyline. A standard grad darkens the top of the sky, which is the wrong area. A reverse grad targets the right one.
Reverse grad vs hard grad vs soft grad
The transition style is a separate choice from the direction. Filters are commonly sold in soft, medium, hard and reverse versions, in strengths from 1 stop (0.3) up to 4 stops (1.2), as one filter buying guide lays out. The reverse type is its own category, because its dark band and its gradual fade are built for one kind of scene.
| Filter type | Darkest part | Best for |
|---|---|---|
| Soft graduated | Top edge, gentle fade | Uneven horizons with mountains or trees |
| Hard graduated | Top edge, abrupt fade | Flat horizons such as the sea |
| Reverse graduated | Center band, fades toward the top | Low sun on or just below a flat horizon |
When a reverse grad earns its place in your bag
NiSi's guidance is that reverse GND filters work best at sunrise and sunset, when the sun is very low or below the horizon, and when the horizon is relatively flat. That matches what most landscape photographers find in the field.
Good scenes include:
- Seascapes at sunrise or sunset. The sea gives a clean, straight horizon, which is the ideal match for the filter's central dark band.
- Salt flats, lakes and open plains. Anywhere the skyline is long, level and uninterrupted.
- Shooting into the light. Photography Life notes that reverse grads are a relatively recent development, useful for sunsets when you shoot toward the sun near the horizon, balancing the glow of the sun against the surrounding sky.
If you shoot a lot of coastline in the golden hour, this filter can save a scene that otherwise forces a choice between a blown-out horizon and a black foreground. Our guide on sunrise vs sunset photography covers how the two kinds of light behave differently, and the landscape photography lighting conditions guide shows where a graduated filter fits among other lighting situations.
When it is the wrong filter
Because the darkest area is close to the center of the filter, it is almost impossible to avoid darkening whatever rises above the horizon, according to Digital Camera World. NiSi makes the same point: prominent mountains, buildings and other objects that extend above the horizon can appear underexposed.
So leave the reverse grad in the bag when you have:
- A jagged mountain skyline
- A city skyline or a lighthouse breaking the horizon
- A row of trees or headland cutting across the glow
- Rolling hills, where the horizon changes height across the frame
In those scenes a soft standard grad, or blending exposures, will look more natural.
Choosing strength: how many stops do you need?
Reverse grads are sold in several densities. NiSi's examples identify 2-stop (0.6), 3-stop (0.9) and 4-stop (1.2) options, with the right choice depending on how much the light varies across the scene. Rather than guessing, measure.
A simple metering method
NiSi describes a straightforward process in its guide to selecting and using graduated filters:
- Put the camera in Manual mode.
- Meter the foreground and set the exposure for it.
- Without changing any settings, meter the brighter part of the sky.
- Read the difference in stops. That difference is the filter strength you need.
- Choose the filter that brings sky and foreground to within about one stop of each other.
Worked example: you set 1/4 second at f/11 for the beach and rocks. Metering the glowing band at the horizon with the same settings suggests it is three stops brighter. A 3-stop (0.9) reverse grad would be the logical starting point, leaving the sky slightly brighter than the foreground, which usually looks natural.
You do not need to erase the difference entirely. A sunrise should still look like a sunrise. One stop of residual contrast keeps the sense of light, and the 2- to 3-stop filters are often enough for that.
Why not simply use the strongest filter?
A filter that is too dense will make the horizon dull and the sky unnatural, with an obvious dark band across the middle. Matching the filter to the measured difference keeps the sky believable. If you often find yourself between strengths, a 2-stop and a 3-stop pair covers most coastal sunrises.
Positioning the filter in the holder
Insert the filter into the holder and slide it up or down until it lines up with the part of the scene whose brightness you want to control, as NiSi's usage tips put it. With a reverse grad, the aim is to place the darkest band on the horizon glow.
The same guide warns that pushing the dark area too low will underexpose the foreground, which defeats the purpose. Work through these steps:
- Compose and focus first. Mount the camera on a tripod, lock in your composition and set focus before the filter goes in.
- Slide the filter in at the horizon. Start with the center band slightly above the horizon line, then adjust.
- Check in Live View. The effect is not always easy to see in the viewfinder, so Live View can help with placement.
- Take a test frame and zoom in. Look at the horizon and at the foreground just below it for a dark smear.
- Adjust and repeat. Tiny movements make a visible difference, especially with a hard transition.
Keep an eye on the lens too. If the lens is wider than the filter can cover, you may see vignetting or the filter holder in the frame. NiSi also notes that between 20mm and 50mm, horizon distortion should be less noticeable than at wider settings, which is a useful range to work in when you can.
Exposure tips that make the filter work harder
A graduated filter handles the contrast between sky and ground, but your exposure settings still decide how the final image feels.
- Expose for the foreground, then let the filter control the sky. This is the logic behind the metering method above.
- Underexpose a touch for richer color. NiSi's Austrian team suggests combining filter use with slight underexposure to make sunset colors more intense.
- Shoot RAW. The extra data gives you latitude to fine-tune shadows and highlights after the filter has done the heavy lifting. Our piece on why to shoot RAW for landscapes explains the benefit in detail.
- Combine with other filters. For silky water or streaking clouds, a full-frame ND can sit alongside the graduated filter. See why landscape photographers use ND filters and what long exposure landscape photography is for how that pairing works.
Reverse grad or exposure blending?
This is the question behind many searches for the filter, and the honest answer is that both are good tools for different jobs.
NiSi's comparison says the choice depends on your camera's dynamic range and your post-processing skills. It recommends exposure blending for complex lighting or when several large objects cross the horizon, and graduated filters if you prefer to capture the scene in a single shot.
| Consideration | Reverse grad | Exposure blending |
|---|---|---|
| Number of frames | One | Two or more |
| Horizon | Flat and clean | Any shape |
| Moving subjects | Handled in one frame | Can cause ghosting between frames |
| Time in the field | Slower setup | Faster setup |
| Time at the computer | Minimal | More editing |
| Result at capture | Balanced on the back of the camera | Needs assembly later |
The filter's real advantage is getting the look right at the moment you press the shutter. Seeing a balanced image on the camera screen helps you judge the light, adjust composition and move on to the next shot while the color lasts. That matters during the short window of a sunrise.
Blending wins when the skyline is irregular, or when the scene needs more range than any single filter can handle. Many experienced photographers carry the filters and still bracket, choosing in the field. If you want to build the editing side of that workflow, read the role of post processing in landscape photography.
A field checklist for your next coastal sunrise
- Arrive early. The best light often comes before the sun clears the horizon.
- Check that the horizon is flat and free of headlands, ships or buildings.
- Set up on a tripod, compose, focus.
- Meter the foreground, then the horizon glow, and read the stop difference.
- Choose the filter strength that gets you within about one stop.
- Slide the filter until the dark band covers the glow, not the foreground.
- Review the histogram and zoom in on the horizon.
- Bracket a safety frame in case you decide to blend later.
For a broader view of how filters, composition and timing fit into different styles, our overview of types of landscape photography techniques is a good companion.
Our perspective
Filters are tools, and the best ones disappear into the image. In the field, I want the light to look the way it felt standing there. A reverse graduated filter, used on a flat horizon with a low sun, does that with a single frame and very little fuss.
What matters more than the glass is the habit behind it: arrive early, read the light, meter both sky and foreground, and decide before the sun rises whether the scene suits a filter or a blend. My prints are made from panoramic medium format film and digital captures, and that attention to detail in the moment is what carries through to the finished piece on the wall.
This is exactly what we teach on our small-group workshops and tours. Standing on a beach with an instructor beside you, placing a filter and watching the horizon respond, is a faster way to learn than any article. Whether you are an amateur building confidence or a professional refining your craft, we would love to help you get that shot.
Mark
Learn it on location
Reading about filters is useful. Placing one at 5:30 a.m. with the sky turning orange is where it clicks. Our small-group photography courses and tours are led by Mark Gray and his team of professional instructors, with luxury arrangements and a focus on exactly this kind of practical, in-the-field skill.
Start with a 1 day photography course if you want a focused introduction, book private lessons if you want to work on your own gear and questions, or join one of our multi-day landscape photography tours in Australia and overseas. If you would like to see what a well-balanced sunrise looks like at print size, browse our limited edition prints. To see the skills these courses build, read what you learn in landscape photography courses.
Frequently asked questions
What is the difference between a reverse grad and a normal graduated ND filter?
A normal graduated ND is darkest at the top edge and fades to clear toward the bottom. A reverse grad is darkest in the middle and lightens toward the top. The reverse design is made for the bright strip of sky where the sun sits near the horizon.
Can I use a reverse grad when there are mountains or buildings on the horizon?
It is not the best choice. The dense central band will darken anything that rises above the horizon, so mountains and buildings can look underexposed. A soft standard grad or an exposure blend usually gives a more natural result in those scenes.
Which strength should I buy first?
It depends on how far apart your sky and foreground readings are. Common reverse grad strengths are 2-stop (0.6), 3-stop (0.9) and 4-stop (1.2). Meter both areas and choose the filter that brings them within about one stop. A 3-stop is a sensible starting point for many sunrises and sunsets.
Do I still need a reverse grad if I can blend exposures?
Not necessarily. Blending suits complex horizons and gives you more control later, while a filter captures the balanced scene in a single shot. Many photographers use both, choosing according to the horizon and the speed of the light.
Sources
- When to use a reverse graduated neutral density filter (NiSi Australia)
- When to use a reverse graduated neutral density filter (NiSi New Zealand)
- Tips for selecting and using graduated neutral density filters (NiSi New Zealand)
- Tips for selecting and using graduated neutral density filters (NiSi USA)
- 5 tips for landscape photography with graduated filters (NiSi Optics)
- GND filters vs multiple exposures (NiSi Optics)
- Reverse ND filters: what are they, and when should photographers use them (Digital Camera World)
- How to use a graduated ND filter in landscape photography (PetaPixel)
- Lens filters explained (Photography Life)
- How a reverse graduated neutral density filter works (Cokin)